Extras
Handstands & Forearm Stands
Core-Concepts
This routine builds the strength, control, and alignment needed for handstands and forearm stands. You’ll train your wrists, shoulders, core, and balance through progressive drills designed to engrain proper technique. These exercises emphasize posture awareness, breath control, and muscle engagement—key components for stable inversions.
I recommend this routine only after completing the recommended quick cardio warmup and the muscle isolation warmup. I also recommend completing this routine before a stretching routine to preserve maximum strength.
Cyclic Thoughts
Posture Strength is Key.
There are many points to review in your head during each exercise. Most of the time you'll correct one point and the other point you just corrected will go back out of whack. Cycle through the points.
- Breath consistently. Try kicking up on the exhale or inhale.
- Fingers spaced out and clawed into the ground, for greater push forward leverage.
- Palms planted firmly against the ground, for a greater push backwards leverage.
- Arms engaged straight, pushing torso away from shoulders.
- Stack shoulders on top of hands.
- Ribs are tucked in and stacked over shoulders.
- Head and neck are lengthened out of the "shoulder pocket".
- Core is engaged, pulling belly button back towards spine, and butt is engaged and tucked in.
- Legs are minimally engaged in position; straight, passé, stag, split, etc.
- Toes and feet are either fully pointed or flexed.
- It will take many repetitions to remember all of these points and to execute them correctly. Be patient with yourself.
- It is important to build proper form in every single exercise. To do this you will need to check yourself in a mirror, take videos of yourself, or have a coach help you.
- The more you practice proper form and breath in the prep exercises, the better your handstands will be.
Beginner Tips
- If you are a beginner, start off with the forearm stand variations. Once you get comfortable in those variations with good form, you can move onto the handstand drills.
- When kicking into a handstand, use a wall, couch, or crash mat behind you, in case you fall backwards. A lot of times fear will inhibit you from kicking far enough to find your balance, but too much of a kick and you'll be in a back bend. If you have a stiff back this can be very dangerous. By using a couch you'll have less of fall, and a cushy one.
- Use a spotter when available. They can also help remind you of form corrections.
Total Time: 30 minutes
1. Twisting Arm Circles
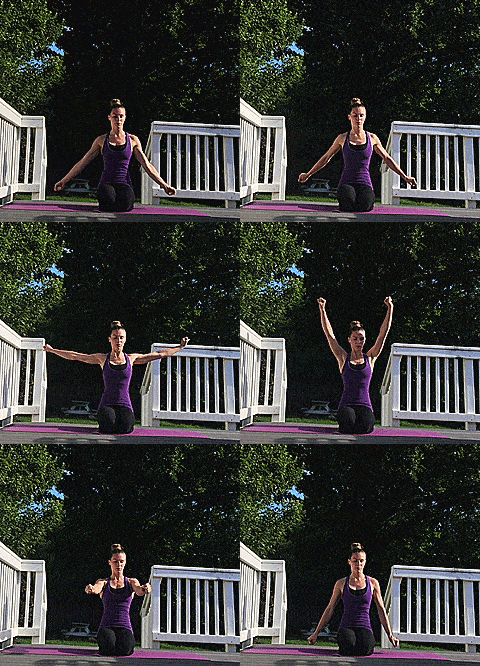
- Twist your arms back and fourth while rotating them in a circle
- Be sure to use your full range of motion.
5 circles.
2. Shoulder Shrugs
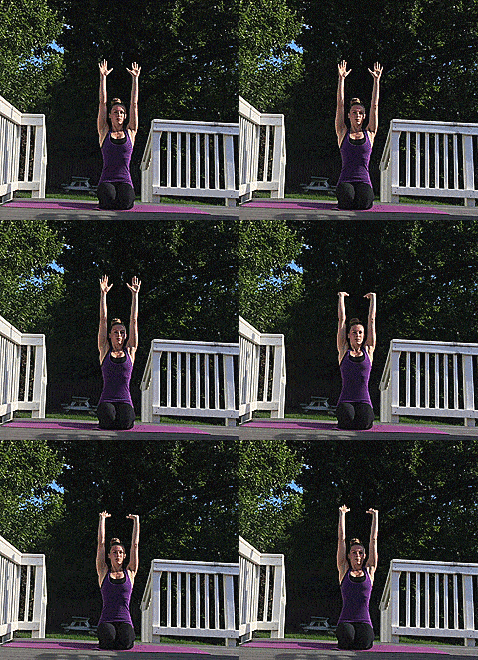
- Start by kneeling with proper posture, reach your arms straight above your head.
- Lock your arms straight and shrug your shoulders upwards.
- Use locked handstand wrists for some of the shrugs, to imitate handstands.
- Repeat kneeling or standing up.
- Make sure your core is engaged, and your neck is lengthened.
2 sets of 10; hold shrug for 20 seconds on 10th rep.
3. Basic Wrist Stretch
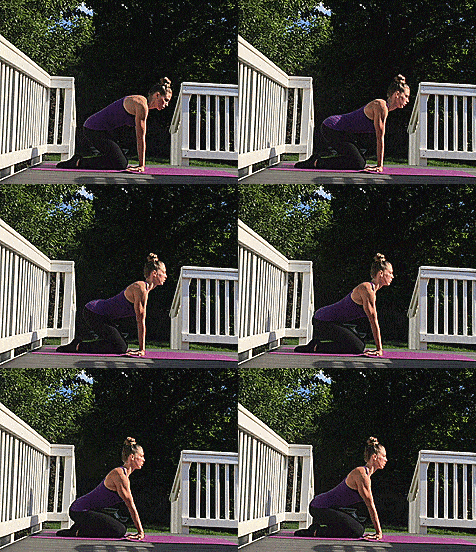
- Kneeling, stack shoulders over wrists with palms flat on the ground.
- Slowly sit back onto your heels while maintaining full palm contact.
10x
4. Leg Lifts to Hollow Body Hold
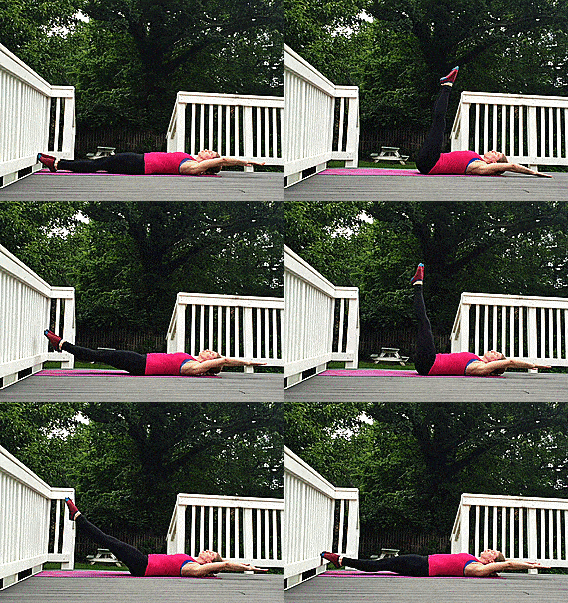
- Lie on your back, arms extended overhead, lower back glued to floor.
- Lift legs to 90°, then slowly lower to hover just above floor.
- Hold hollow body position on 10th rep for 15 seconds.
- Breath steady, and focus on your core muscles glued to the ground.
2 sets of 10; hold hollow body for 15 seconds on 10th rep.
5. Forearm Stand Single Leg Lift
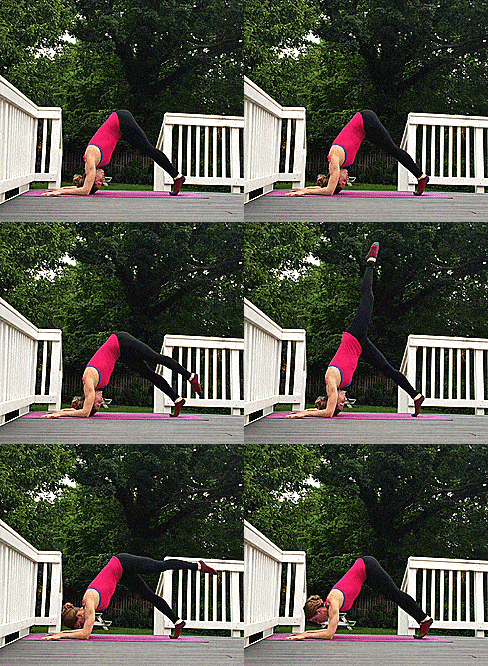
- Hands and forearms are shoulder width apart. Alternatively you can pull your hands inwards and create a triangle.
- Make a right angle with your arms by stacking your shoulders on top of your elbows. You will have to walk in towards your elbows, lifting your butt and core up and back.
- Lift a leg as high as you can while lifting onto your base leg tippy toes.
10x each leg.
6a. Forearm Stand Kickoff
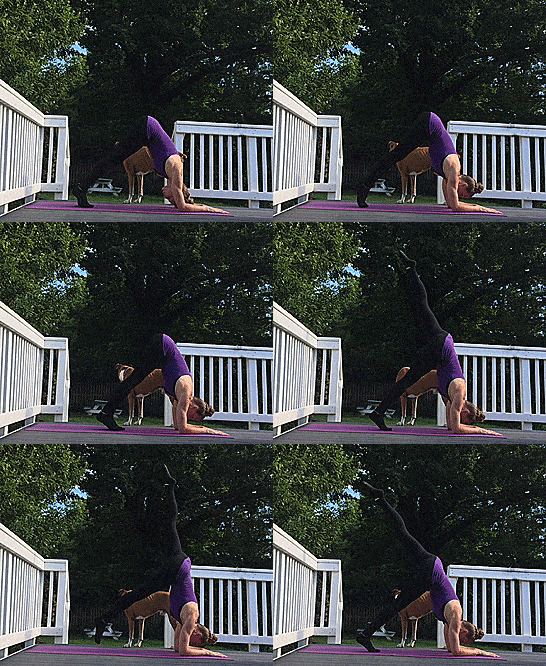
- Hands and forearms are shoulder width apart. Alternatively you can pull your hands inwards and create a triangle.
- Make a right angle with your arms by stacking your shoulders on top of your elbows. You will have to walk in towards your elbows, while lifting your butt and core upwards and backwards.
- Lift a leg as high as you can, use your base leg tippy toe to slightly push off.
Use your leg and core muscles to pull you into a strong straight position.
- Complete all of the following variations for a forearm stand focused routine. Skip if doing a handstand focused routine.
5x each leg.
6b. Forearm Stand Kickoff and Meet
- Instead of leaving your kickoff leg hanging, pick it up to meet the other leg, and then pull it back down to catch your descent.
5x each leg.
6c. Forearm Stand Scissor Kicks
- Same thing as 6b but you switch your legs in the air, so the other leg will catch your descent and become the new kick off leg.
7. Forearm Stand Holds - Straight Legs
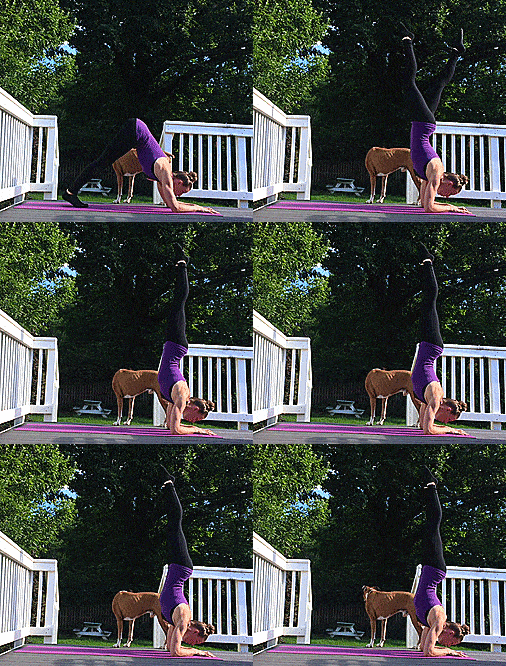
- Place hands and forearms shoulder-width apart. Alternatively, pull hands inward to create a triangle base.
- Walk feet in toward elbows, stacking shoulders directly above elbows, forming a right angle with arms.
- Lift or lightly kick one leg straight up; use your base foot tippy toe to assist, then bring the other leg up to meet.
- Press into hands and fingers to control forward balance, and into forearms and elbows to control backward balance.
- Engage core and ribs, push shoulders upward, and actively pull armpits forward to open the chest and straighten upper back.
- Continuously adjust posture through muscle engagement and relaxation.
- Breathe steadily throughout each hold.
- Use video or mirror feedback to assess upper back alignment and find areas to improve shoulder stacking and rib position.
- As control improves, practice variations such as straight legs, passé, stag, or splits.
5x - Minimum: hold for 5 seconds.
8a. T-Shape Handstand Prep
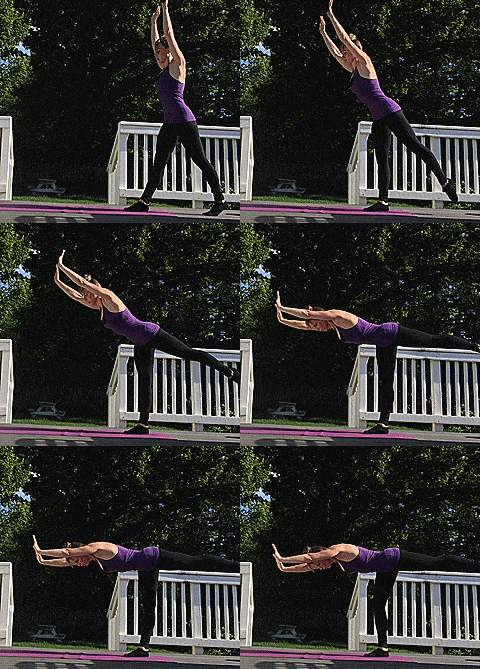
- Hands are shoulder's width apart, fingers are spread and clawed, palms are firmly pressed into the ground.
- Use a wall, railing or something similar to walk up and rest your feet against.
- Push up and pull your butt back to create a perfect 90 degree angle; hips, core, ribs, and shoulders are stacked directly above hands and wrists.
- Engage your muscles to hold position and gain muscle memory.
- Practice leaning forward and backwards into your fingers and palms like a seesaw to gain strength and balance.
- From this move you'll continue on to 8b and 8c, eventually without coming down in-between. Rest as needed.
8c. L-Shape Handstand Shrugs and/or Pushups
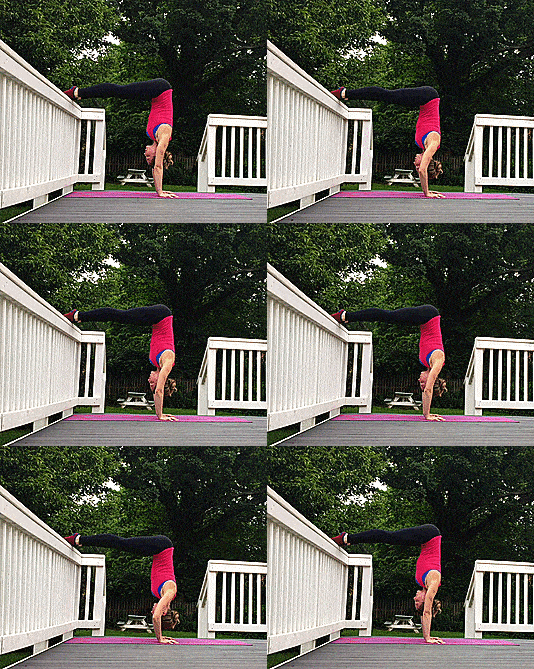
- Continuing from 8a, if you're comfortable, try to shrug your shoulders; pushing your torso up and away from your straightened arms.
- If you are still comfortable, slightly depress into your arms. Think about your shoulders coming straight down; not forward or backwards because you'll lose your form and strength.
- Push back up into your shoulder shrug, do a posture check, then repeat.
- For this specific move, it is common to want to round your upper back. Normally when in doubt, pull your armpits forward to stack your shoulders on top of your wrists.
- As you advanced you'll try depressing lower and lower.
- If you can only do one today, just think next time you'll be able to do two or maybe even more! Celebrate the small victories 🙂
10x, or as many times as possible.
8D. L-Shaped Handstand to Straight Leg
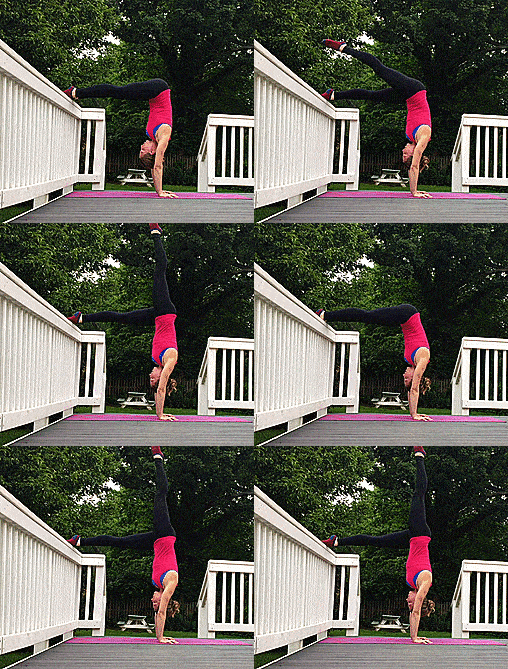
- Continuing from 8a, lift 1 leg straight into the air and stacked directly on top of your core.
- To advance, slowly try to bring up your other leg; get your fingers ready to push you forwards towards safety.
- Make sure your leg doesn't extend too far backwards.
5x each leg.
9a. Handstand Kickoff
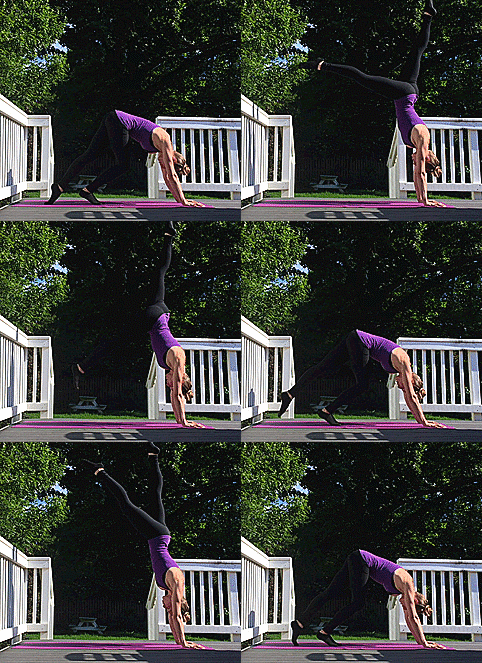
- Hands are shoulder's width apart, fingers are spread and clawed, palms are firmly pressed into the ground.
- Slightly lunge into your kickoff leg and push off your toes.
- Try to maintain a straight leg and back in-line with your straight arms.
- Think about pushing your shoulders back into your fingers, meanwhile prepare your fingers to push you forward into your palms and lastly your palms push you backwards into your fingers and vice versa until you find your balance.
5x each leg
9b. Handstand Kickoff and Meet

- Continue from 9a and meet your kickoff leg to the straight leg and back down.
5x each leg
9c. Handstand Kickoff Scissor Kick
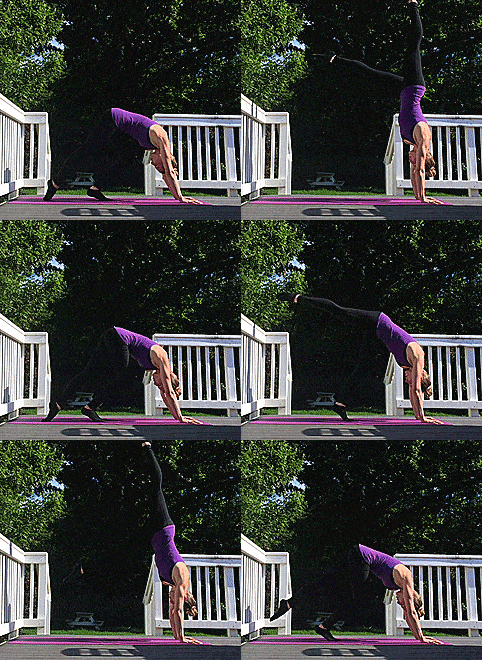
- Continuing from 9a, switch your legs in the air, so the initial straight leg will catch your descent and become the new kick off leg.
- Always engage your core and open your shoulders while engaging your shoulders upward.
5x each leg
10. Handstand Holds
- Breath consistently. Try both kicking up on the exhale and inhale and maintaining breath throughout.
- Fingers spaced out and clawed into the ground, to allow for greater push forward leverage.
- Palms planted firmly against the ground of greater push back leverage.
- Arms engaged straight, pushing torso away from shoulders.
- Stack shoulders on top of hands.
- Ribs are tucked in and stacked over shoulders.
- Head and neck are lengthened out of the "shoulder pocket".
- Core is engaged, pulling belly button back towards spine, and butt is tucked in.
- Legs are minimally engaged in position; straight, passé, stag, split, etc.
- Toes and feet are either fully pointed or flexed.
10x; each time try to hold as long as you can, up against a wall, by yourself or with a spotter.
11a. Advanced Forearm Stands - Seated Pose
- It is common to want to bend at the lower back, but for this move it must be the middle back that arches.
- As you will notice I transition from lower back to middle back by pushing tall into me shoulders and pulling my armpits forward.
- Meanwhile your butt with be moving upwards and backwards; you'll essentially feel like you're sitting in your middle and upper back.
- Once your as far as you can go, think about scrunching down slowly.
11b. Advanced Forearm Stand with Backbend
- Your main focus will be to push you torso upwards, away from your shoulders, and then pull your armpits forward as you start to bend your back and descend your legs behind you.
- Simply put; push upward and forward, and slowly descend.
- To keep you balance as you descend lower, you can pull one leg in.


